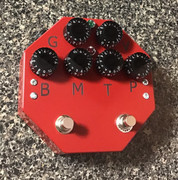
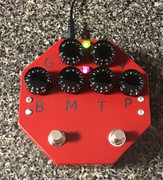
This is the red channel from the randall 80es 100es preamp or "preamp from hell"
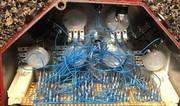
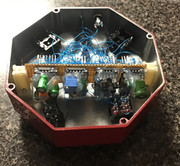
except wire-wrap is used instead of a pcb.
Wire-wrap is a technique to make electrical connections. It is very reliable and has even been used by NASA. It's also easier and quicker than soldering for me.
https://www.nutsvolts.com/magazine/article/wire_wrap_is_alive_and_well
Introduction to wire wrap
https://www.youtube.com/watch?v=IXvEDM-m9CE
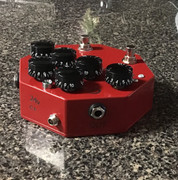
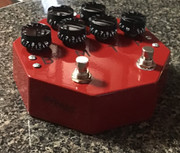
here is one I made
Want to make one?
You are going to need some wire-wrap pins or sockets. I used 8 wire-wrap sockets with 14 pins per piece.
I also used 8 x 14 pin ic sockets for the components. The components are inserted into ic sockets and then the ic sockets are later inserted into the wire-wrap sockets. You could just insert the components directly into the wire-wrap sockets but putting them into ic sockets allows ease of repair and to swap out components quickly. You can test all the components, out of circuit, by just pulling the ic sockets out. If you want to try carbon comp resistors instead of metal film you can just pull out a ic socket with the metal film resistors and put a new ic socket in with carbon comp resistors. Or switch out capacitors quickly etc...

Amazon or ebay has cheap wire-wrap tools. I have found that after a lot of wrapping 28 gauge wire the cheap blue tool doesn't work as well.. Also the strippers on those are nearly useless for 28 gauge. The 28 gauge wire strips better with a blue handle wire stripper that is "pro tools" brand. The 28 strips in the 30 gauge slot...
I got lucky and found an old ok machine electric wire-wrap tool on ebay for cheap.
Wrap the wires
I used 28 gauge solid core silver plated kynar ul422. There is another kynar in the same gauge but with a different ul number. I don't like it as much because it seems harder to strip. There are 60 or 70 wires to wrap.
Start stripping, follow this order, and then you should have a circuit to insert your components into :icon_lol:
hmm not sure where the dashes went. obviously %u2013 is mean to mean a dash
B28 %u2013 Input
A28 %u2013 D24
D22 %u2013 B26
D22 %u2013 C19
B26 %u2013 C22
C20 %u2013 B22
B22 %u2013 D25
C10 %u2013 C21
C21 %u2013 D14
D12 %u2013 B21
D12 %u2013 Gain Vref
A21 %u2013 C27
C28 %u2013 A19
A19 %u2013 50k Wiper
B19 %u2013 C14
B19 %u2013 C16
C18 %u2013 C12
C12 %u2013 D8
C17 %u2013 B23
C17 %u2013 C7
C18 %u2013 D21
B15 %u2013 D20
D20 %u2013 C3
C4 %u2013 A11
A11 %u2013 A9
A9 %u2013 A10
B9 %u2013 Sustain +
B10 %u2013 B9
C 4 %u2013 B1
B1 %u2013 Vol. Vref
B2 %u2013 Vol. Wiper
B2 %u2013 B13
A12 %u2013 B11
A13 %u2013 B6
A13 %u2013 A14
B14 %u2013 A2
B14 -B5
B3 %u2013 Mid. Wiper
A1 %u2013 Treble Ground
A1 %u2013 Bass Vref
A3 %u2013 Mid. Vref
A3 %u2013 Bass Wiper
A3 %u2013 Bass Ground
B7 %u2013 Treble Vref
D6 %u2013 Treble Wiper
D1 %u2013 D1
D15 %u2013 D1
D7 %u2013 D18
B16 %u2013 D17
D17 %u2013 D4
D3 %u2013 B18
A18 %u2013 Prez Vref
A18 %u2013 A24
B24 %u2013 Out
A7 %u2013 Prez Ground
A7 %u2013 Prez Wiper
A6 %u2013 D19
A6 %u2013 24v +
A6 %u2013 D16
D16 %u2013 C15
D19 %u2013 D10
D10 %u2013 C8
C25 %u2013 A26
C25 %u2013 Input Ground
A26 %u2013 A22
A22 %u2013 D28
D28 -D26
D26 %u2013 Gain Ground
D26 %u2013 A23
A23 %u2013 C6
C6 %u2013 A15
A15 %u2013 B12
B12 %u2013 C13
C13 %u2013 Vol. Ground
C13 %u2013 C11
C11 %u2013 Sustain Ground
C11 %u2013 D5
D5 %u2013 Mid. Ground
D5 %u2013 C1
C1 %u2013 A16
A16 %u2013 A4
A4 %u2013 Out Ground
D8 %u2013 D9
C9 %u2013 C10
A4 %u2013 Stomp Switch
Stomp Switch Layout

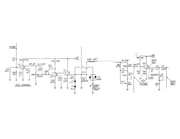
Here is the randall red channel schematic that I cut up and printed out. It made it easier to make the wrap order.
With a large wire-wrap bit you can even wrap the the pot leads. I put a little tack of solder on those for extra reliability.
For the power supply I tried several different power supplies. I found the jameco 500ma 24v linear regulated power supply to be the quietest. Most Switch mode power supplies will make a very horrible noise. I also tried 24v batteries meant for garage remotes and they had a whine to them. I did not like how it sounded with two 9 volt batteries. You may be able to do the 9v to 24v boost that was on geofx...seems to have taken it down for some reason and is telling people not to use it without permission or something weird... also with the 9v to 24v I'm not sure what kind of ripple noise will be heard or "sag" you might feel with gain maxed.
Some info on attaching the components to the ic sockets:
I tried conductive silver expoxy. Basically it is put in the oven at 150c for 15 minutes and it hardens. Pretty cool but some components like polysterene 250pf capacitors will melts. If you use all high temp components it might be fine.
Then there is solder paste.
most through hole components do not allow temps high enough for putting into a reflow oven. I tried to use the reflow skillet method but the capacitors will start bulging before reflow temp is reached.
If you get the right diameter lead it will fit snugly into the gold plated socket then put some nasty hot glue on it or maybe dip the whole thing in some resin. I've been using my personal one without glue or solder and it hasn't broken in a few months and i've dropped it with just the bare board clipped to a "third hand"
edit: forgot to add I swapped values for the volume and gain pot. it works a lot better like that. not sure if there is an error in schematic or what. also the audio 50k log pots should be reverse log if you want them to turn the right way once mounted.
If anyone doesn't want to make one but wants one. Email me hellr8zr@protonmail.com i have one extra and some parts to make a couple more. will trade for bitcoin.
except wire-wrap is used instead of a pcb.
Wire-wrap is a technique to make electrical connections. It is very reliable and has even been used by NASA. It's also easier and quicker than soldering for me.
https://www.nutsvolts.com/magazine/article/wire_wrap_is_alive_and_well
Introduction to wire wrap
https://www.youtube.com/watch?v=IXvEDM-m9CE
here is one I made


Want to make one?
You are going to need some wire-wrap pins or sockets. I used 8 wire-wrap sockets with 14 pins per piece.
I also used 8 x 14 pin ic sockets for the components. The components are inserted into ic sockets and then the ic sockets are later inserted into the wire-wrap sockets. You could just insert the components directly into the wire-wrap sockets but putting them into ic sockets allows ease of repair and to swap out components quickly. You can test all the components, out of circuit, by just pulling the ic sockets out. If you want to try carbon comp resistors instead of metal film you can just pull out a ic socket with the metal film resistors and put a new ic socket in with carbon comp resistors. Or switch out capacitors quickly etc...

Amazon or ebay has cheap wire-wrap tools. I have found that after a lot of wrapping 28 gauge wire the cheap blue tool doesn't work as well.. Also the strippers on those are nearly useless for 28 gauge. The 28 gauge wire strips better with a blue handle wire stripper that is "pro tools" brand. The 28 strips in the 30 gauge slot...
I got lucky and found an old ok machine electric wire-wrap tool on ebay for cheap.
Wrap the wires
I used 28 gauge solid core silver plated kynar ul422. There is another kynar in the same gauge but with a different ul number. I don't like it as much because it seems harder to strip. There are 60 or 70 wires to wrap.
Start stripping, follow this order, and then you should have a circuit to insert your components into :icon_lol:
hmm not sure where the dashes went. obviously %u2013 is mean to mean a dash
B28 %u2013 Input
A28 %u2013 D24
D22 %u2013 B26
D22 %u2013 C19
B26 %u2013 C22
C20 %u2013 B22
B22 %u2013 D25
C10 %u2013 C21
C21 %u2013 D14
D12 %u2013 B21
D12 %u2013 Gain Vref
A21 %u2013 C27
C28 %u2013 A19
A19 %u2013 50k Wiper
B19 %u2013 C14
B19 %u2013 C16
C18 %u2013 C12
C12 %u2013 D8
C17 %u2013 B23
C17 %u2013 C7
C18 %u2013 D21
B15 %u2013 D20
D20 %u2013 C3
C4 %u2013 A11
A11 %u2013 A9
A9 %u2013 A10
B9 %u2013 Sustain +
B10 %u2013 B9
C 4 %u2013 B1
B1 %u2013 Vol. Vref
B2 %u2013 Vol. Wiper
B2 %u2013 B13
A12 %u2013 B11
A13 %u2013 B6
A13 %u2013 A14
B14 %u2013 A2
B14 -B5
B3 %u2013 Mid. Wiper
A1 %u2013 Treble Ground
A1 %u2013 Bass Vref
A3 %u2013 Mid. Vref
A3 %u2013 Bass Wiper
A3 %u2013 Bass Ground
B7 %u2013 Treble Vref
D6 %u2013 Treble Wiper
D1 %u2013 D1
D15 %u2013 D1
D7 %u2013 D18
B16 %u2013 D17
D17 %u2013 D4
D3 %u2013 B18
A18 %u2013 Prez Vref
A18 %u2013 A24
B24 %u2013 Out
A7 %u2013 Prez Ground
A7 %u2013 Prez Wiper
A6 %u2013 D19
A6 %u2013 24v +
A6 %u2013 D16
D16 %u2013 C15
D19 %u2013 D10
D10 %u2013 C8
C25 %u2013 A26
C25 %u2013 Input Ground
A26 %u2013 A22
A22 %u2013 D28
D28 -D26
D26 %u2013 Gain Ground
D26 %u2013 A23
A23 %u2013 C6
C6 %u2013 A15
A15 %u2013 B12
B12 %u2013 C13
C13 %u2013 Vol. Ground
C13 %u2013 C11
C11 %u2013 Sustain Ground
C11 %u2013 D5
D5 %u2013 Mid. Ground
D5 %u2013 C1
C1 %u2013 A16
A16 %u2013 A4
A4 %u2013 Out Ground
D8 %u2013 D9
C9 %u2013 C10
A4 %u2013 Stomp Switch
Stomp Switch Layout

Here is the randall red channel schematic that I cut up and printed out. It made it easier to make the wrap order.

With a large wire-wrap bit you can even wrap the the pot leads. I put a little tack of solder on those for extra reliability.
For the power supply I tried several different power supplies. I found the jameco 500ma 24v linear regulated power supply to be the quietest. Most Switch mode power supplies will make a very horrible noise. I also tried 24v batteries meant for garage remotes and they had a whine to them. I did not like how it sounded with two 9 volt batteries. You may be able to do the 9v to 24v boost that was on geofx...seems to have taken it down for some reason and is telling people not to use it without permission or something weird... also with the 9v to 24v I'm not sure what kind of ripple noise will be heard or "sag" you might feel with gain maxed.
Some info on attaching the components to the ic sockets:
I tried conductive silver expoxy. Basically it is put in the oven at 150c for 15 minutes and it hardens. Pretty cool but some components like polysterene 250pf capacitors will melts. If you use all high temp components it might be fine.
Then there is solder paste.
most through hole components do not allow temps high enough for putting into a reflow oven. I tried to use the reflow skillet method but the capacitors will start bulging before reflow temp is reached.
If you get the right diameter lead it will fit snugly into the gold plated socket then put some nasty hot glue on it or maybe dip the whole thing in some resin. I've been using my personal one without glue or solder and it hasn't broken in a few months and i've dropped it with just the bare board clipped to a "third hand"
edit: forgot to add I swapped values for the volume and gain pot. it works a lot better like that. not sure if there is an error in schematic or what. also the audio 50k log pots should be reverse log if you want them to turn the right way once mounted.
If anyone doesn't want to make one but wants one. Email me hellr8zr@protonmail.com i have one extra and some parts to make a couple more. will trade for bitcoin.
